Smola S5 User Manual
Read this manual thoroughly before operation and keep it for future reference.
Important Safety Information
Danger
- This product and its accessories are not toys; keep them out of children's reach to prevent accidents.
- Do not plug in or unplug the power cord with wet hands, and keep the cord away from liquids.
- Do not operate the unit if the power cord is damaged or the plug fits loosely in the socket.
Warnings
- Before connecting to power, confirm that the rated voltage on the product matches the local supply.
- Use the equipment only on circuits that can support its electrical load.
- Ensure the product is properly grounded.
- Surfaces become hot during operation; do not touch the heating elements or housing with bare hands or skin to avoid burns.
- Unplug the unit when not in use to ensure safety.
- If you notice any abnormal conditions or malfunctions, stop using the product, disconnect the power, troubleshoot according to the fault type, and contact our service department if needed.
- Never enable heating when the drum is not turning.
- Do not disassemble, modify, or replace components yourself.
- Do not immerse the product in water or any liquid, and do not clean it with pressurized water.
- Do not strike or drop the product; if it is damaged by impact, discontinue use.
- Individuals with physical, sensory, or cognitive limitations, or without relevant experience (including children), may use the product only under supervision.
Operation
Basic Steps
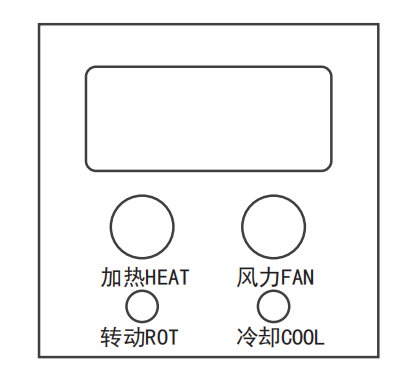
- After connecting power, turn on the main switch.
- Hold the left knob and press the rotation button to start the drum.
Usage Notes
- Never activate heating while the drum is stationary.
Settings
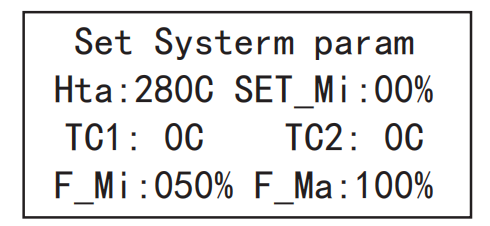
With the unit powered on and the screen still off, hold the right knob to enter the parameter settings screen. Parameters are defined as follows:
- Hta: High-temperature alarm threshold, default 280°C; adjust as required.
- SET_Mi: Minimum airflow activation value. During roasting, airflow must be at or above this value before heat can be adjusted.
- TC1: Furnace temperature offset.
- TC2: Bean temperature offset.
- F_Mi: Minimum airflow limit, preset at the factory; modify with caution.
- F_Ma: Maximum airflow limit, preset at the factory; modify with caution.
- Note: After changing F_Mi and F_Ma, the 0-100% airflow scale is remapped between the new limits.
Manual Mode
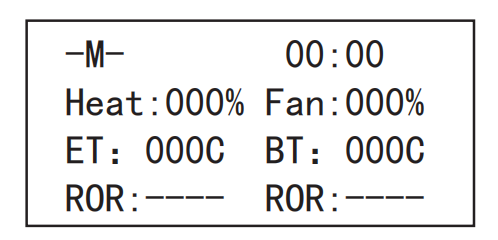
With the unit powered on and the screen off, hold the left knob to enter manual mode. Interface elements are explained below:
- -M-: Manual mode indicator.
- 00:00: Timer display. The timer starts automatically at power-on. Press the right button to reset and restart timing; press it again to pause. Repeat as needed.
- Heat: Heating power control, adjustable from 0-100%. If SET_Mi is configured, airflow must be at or above that value before adjusting heat.
- Fan: Airflow control, adjustable from 0-100%.
- ET/BT: Furnace temperature and bean temperature respectively.
- ROR: Rate of rise for furnace temperature and bean temperature.
One-Touch Preheat
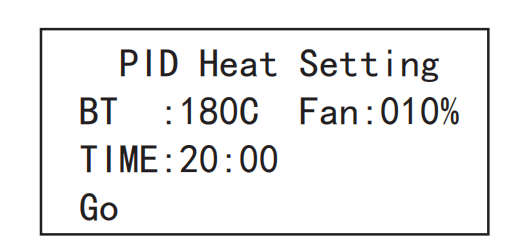
While in manual mode, hold both knobs simultaneously to open the one-touch preheat screen:
- PID Heat Setting: Entry point for one-touch preheat parameters.
- BT: Target preheat temperature, default 180°C.
- FAN: Preheat airflow setting.
- TIME: Preheat duration, default 20 minutes.
- Go: Execute the one-touch preheat routine.
Configuration steps: When the temperature value flashes, rotate the left knob to set it. Press the left knob to move to airflow and adjust as needed. Press the left knob again to set the time. After confirming all parameters, press the left knob once more to access the start command, then press the right knob to begin one-touch preheating.